License Management & Removal
Once UpgradeMate has finished its work in your environment, you may need to swap your license file (for example, when moving from a demo to a production license) or remove UpgradeMate completely. UpgradeMate creates objects in several Configuration Manager workspaces — collections, task sequences, packages, OS upgrade packages, client settings — and cleaning these up by hand is error-prone. The built-in management wizard handles both license updates and a clean uninstall for you.
Video Tutorial
Requirements
- The Initial Configuration must already be in place — the management wizard only appears when UpgradeMate detects an existing configuration.
Step-by-Step Guide
Launch the Management Wizard
You manage and remove UpgradeMate from the same wizard you used to install it. When UpgradeMate detects an existing configuration on the Configuration Manager site, it automatically opens the Manage Current Configuration screen instead of the install wizard.
On the machine where UpgradeMate is installed, launch UpgradeMate from the Start menu. Make sure you launch it with Run as Administrator.
UpgradeMate detects the previous configuration automatically and opens the Manage Current Configuration screen. The screen shows the items currently installed in your environment (Collections, Base Folders, OS Upgrade Packages, Task Sequences, Packages, Client Settings) and offers two actions: Update License and Remove Configuration.
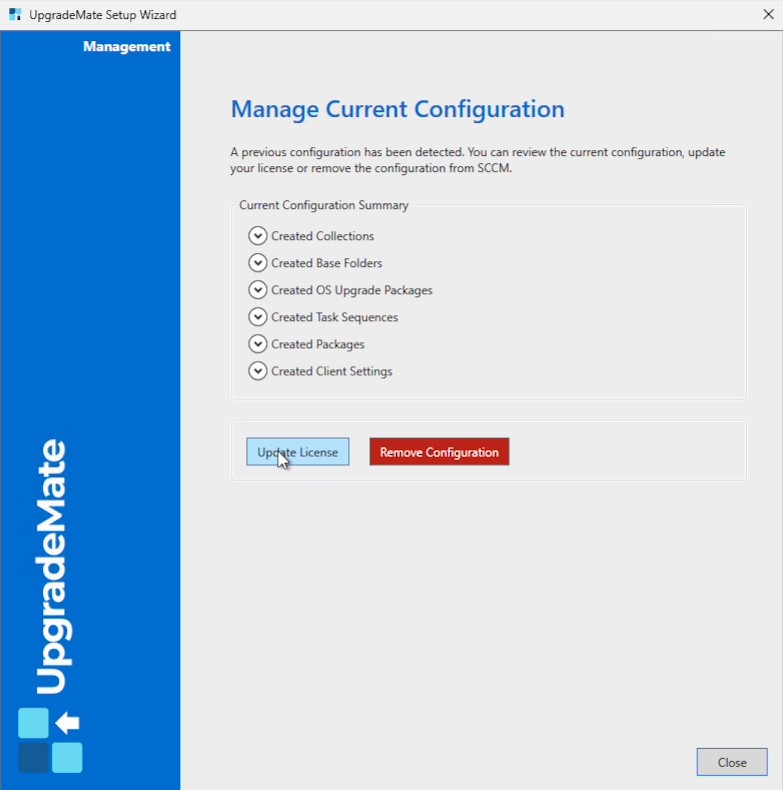
Update Your License
Use Update License when you need to swap your active license file — for example, when moving from a demo license to a production one, or when your current license is about to expire.
On the Manage Current Configuration screen, click Update License.
Browse to the new license file and confirm. UpgradeMate updates the active license without touching any of the existing collections, task sequences or packages.
While you are on this screen you can also expand each item in the Current Configuration Summary to review what UpgradeMate has provisioned in your Configuration Manager environment.
Remove the Configuration
The Remove Configuration action runs the built-in uninstall, removing every object UpgradeMate created in Configuration Manager so you do not have to clean them up by hand.
On the Manage Current Configuration screen, click the red Remove Configuration button.
Watch the progress list. Each category is removed in order, with a status and a description of what happened:
- Remove Client Settings — the custom CCM cache client setting.
- Remove Task Sequences — the scan and execute task sequences.
- Remove Packages — the
UpgradeMateFormpackage. - Remove OS Upgrade Packages — every OS Upgrade Package created from your imported ISOs.
- Remove Collections — all 12 device collections in the UpgradeMate folder.
- Remove ConfigMgr Folders — the folder structure created under Software Library and Assets and Compliance.
- Remove Source Folder — the source files folder you specified during setup.
- Remove Config File — the local UpgradeMate configuration file (archived).
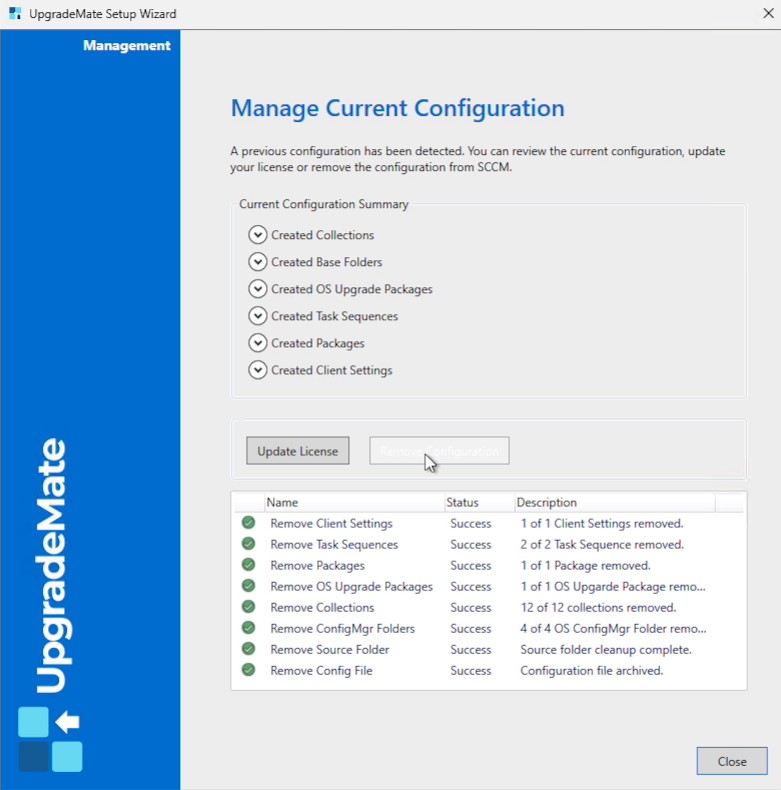
Note: If a package cannot be removed automatically (for example, because it is in use by another deployment outside UpgradeMate), the row in the list shows the failure. Open the Configuration Manager console and remove that specific item manually.
When the run finishes, click Close. Optionally open the Configuration Manager console to confirm that the task sequences are gone and the collections folder under Assets and Compliance → Device Collections has been deleted.
Removal complete. If you launch UpgradeMate again, it greets you with the install wizard so you can start a fresh configuration whenever you need one.